Following the deployment of KVM-based HPE VM Essentials (VME) and HPE SimpliVity HCI, integrating Veeam Backup & Replication for image-level backups and disaster recovery verification drills is a critical operational procedure to ensure enterprise service continuity.
However, when performing full image restores for multi-disk virtual machines (VMs with two or more virtual disks, such as separate OS and data volumes), administrators may encounter an unexpected restore blockage caused by disk index collisions.
This article details the root cause of the Veeam VirtIO disk matching failure in HPE VME and demonstrates how to unlock the hidden Cloud Advanced Options in VME Manager to reassign unique VirtIO bus indexes.
1. Symptoms & Veeam Restore Session Error Log
During a scheduled restore verification drill of a multi-disk VM backed up from HPE VME, the Veeam Full VM Restore workflow stalled and returned the following infrastructure API error:
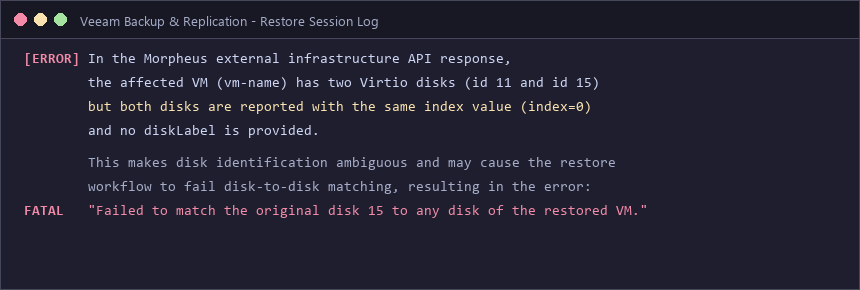
In the Morpheus external infrastructure API response,
the affected VM (vm-name) has two Virtio disks (id 11 and id 15)
but both disks are reported with the same index value (index=0)
and no diskLabel is provided.

This makes disk identification ambiguous and may cause the restore
workflow to fail disk-to-disk matching, resulting in the error:
“Failed to match the original disk 15 to any disk of the restored VM.”
Analysis of the Failure
- Morpheus-Driven API Layer: HPE VME Manager utilizes the Morpheus orchestration engine beneath its cloud management API layer.
- Duplicate Disk Indexing (
index=0): The API reported both attached VirtIO disks (id 11andid 15) with the identical index value0and without distinct disk labels. - Ambiguous Disk Matching: Because Veeam’s restore engine requires deterministic 1:1 disk mapping between source backup definitions and target VM volumes, the duplicate index rendered
disk 15unmatchable, aborting the restore.
2. Inspecting VME Manager: Duplicate Mount Points (VIRTIO 0:0)
Navigating to the affected VM’s storage configuration within the HPE VME Manager console revealed the direct root cause:
 (Figure: Both virtual disks vda and vdb assigned the exact same MOUNT POINT: VIRTIO 0:0)
- Disk 0 (
vda): Storage ControllerVirtIO Block/ Mount PointVIRTIO 0:0 - Disk 2 (
vdb): Storage ControllerVirtIO Block/ Mount PointVIRTIO 0:0
Even though Linux recognizes the block devices sequentially at the kernel level (vda, vdb), both disks were pinned to controller index VIRTIO 0:0 at the hypervisor configuration layer. For Veeam, which relies on strict hypervisor API metadata rather than in-guest device naming, this duplicate bus position creates an unresolvable collision.
3. The Solution: Unlocking Hidden VirtIO Bus Options in Cloud Settings
When attempting to fix the issue directly via Reconfigure Server on the VM, the dropdown menu for changing the VirtIO mount point is initially greyed out or completely unavailable under default platform settings.
To make the VirtIO bus numbering editable, administrators must first enable disk and storage type selection policies at the parent Cloud configuration level.
Step 1. Enable Cloud Advanced Options
Navigate to the infrastructure cloud settings within the HPE VME console:
Infrastructure > Clouds > Select your SimpliVity Cloud > Edit
Expand the Advanced Options dropdown near the bottom of the page, check the following options, and save:
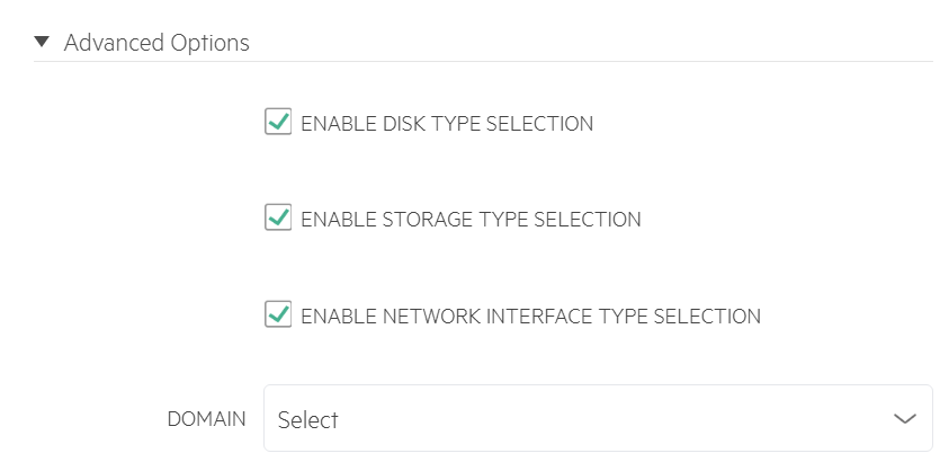 (Figure: Enabling DISK TYPE SELECTION and STORAGE TYPE SELECTION under Cloud Advanced Options)
[x] ENABLE DISK TYPE SELECTION[x] ENABLE STORAGE TYPE SELECTION[x] ENABLE NETWORK INTERFACE TYPE SELECTION
4. Reconfiguring the Server: Reassigning VirtIO Numbering (VIRTIO 0:1)
With the cloud-level policies saved, return to the VM instance management view:
Select VM > Actions > Reconfigure Server
Under the VOLUMES section, the controller type and mount point dropdowns are now fully exposed and interactive.
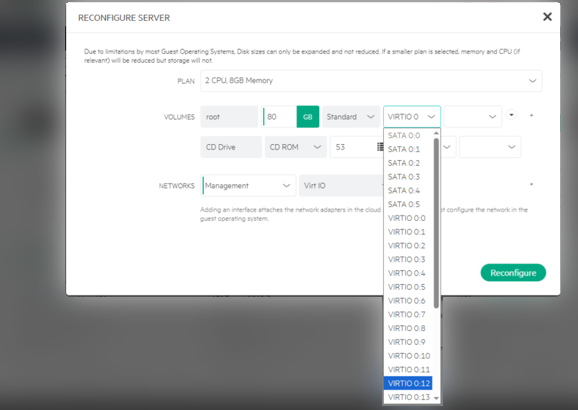 (Figure: Selecting a distinct mount point such as VIRTIO 0:1 for the secondary disk)
- Root OS Disk (
vda): Maintain the primary mount pointVIRTIO 0:0. - Secondary Data Disk (
vdb): Open the dropdown and select an unused, unique index such asVIRTIO 0:1. - Click
Reconfigureat the bottom right to apply changes.
Once applied, the storage table will show vda mapped to VIRTIO 0:0 and vdb mapped to VIRTIO 0:1.
5. Verification & Successful Veeam Restore
With unique VirtIO bus addresses assigned, verify the operational loop:
- Initiate New Veeam Backup: The VME API correctly presents
index=0andindex=1for the respective disks in its infrastructure payload. - Execute Full VM Restore:
- Veeam’s restore engine achieves seamless 1:1 disk matching for both volumes.
- The error
Failed to match the original disk 15 to any disk of the restored VMis completely eliminated, and the restore finishes successfully.
6. Key Takeaways & Best Practices
- Always audit disk bus layouts on multi-disk templates:
In KVM/QEMU-based virtualization platforms, multi-disk instances created from certain legacy templates or quick provisioning steps can inadvertently share controller positions (0:0). Even if guest OS boots normally, third-party backup and replication tools will choke at the API layer. - Explore parent cloud policies when options are missing:
HPE VME streamlines cloud operations by concealing lower-level hardware controls by default. Whenever granular disk, NIC, or bus controller options appear locked, inspect the parentCloud > Advanced Optionsconfiguration.