In response to evolving VMware enterprise licensing models, many IT organizations are actively evaluating migration to KVM-based HPE VM Essentials (VME) and HPE SimpliVity HCI architectures, as well as establishing cross-hypervisor disaster recovery (DR) capabilities.
While intra-hypervisor migrations typically rely on online continuous replication across high-speed links, operating across isolated sites with a mere 10Mbps network bandwidth makes real-time network streaming physically impractical. Migrating a multi-gigabyte virtual machine over 10Mbps would require dozens of hours.
In such constrained field conditions, the most dependable operational strategy is physically copying raw Veeam backup data files (.vbk) and metadata files (.vbm) to external storage, mounting them at the target datacenter, and performing an offline V2V (Virtual-to-Virtual) restore.
This guide details the complete production procedure of importing VMware vSphere Windows 10 backup files into a target Veeam infrastructure and restoring the VM to an HPE VME cluster in just 18 minutes, complete with automated VirtIO driver injection and verified driver cleanups.
Production Recovery Environment Summary
| Metric | Source Infrastructure | Target Infrastructure |
|---|---|---|
| Hypervisor | VMware vSphere (ESXi) | HPE SimpliVity with HPE VME (KVM-based HVM) |
| Backup Platform | Veeam Backup & Replication v11 | Veeam Backup & Replication (VME Worker Architecture) |
| Backup Format | Full Backup Data (.vbk) + Backup Metadata (.vbm) | Local repository transfer followed by Import Backup |
| Network Link | Extreme 10Mbps WAN bottleneck (Physical copy mandatory) | High-speed 10G/25G internal datacenter fabric |
| Target Guest OS | Windows 10 Pro (VMware Tools installed) | Clean boot backed by KVM Red Hat VirtIO drivers |
1. 10Mbps Bandwidth Bottleneck and Physical Backup File Relocation
Constrained by a 10Mbps network link, achieving a near-zero Recovery Point Objective (RPO) via online replication is impossible due to transmission lag.
Consequently, the operational protocol prioritized physical relocation: copying the primary full backup data file (*.vbk) along with the indispensable backup metadata file (*.vbm) directly onto high-capacity external storage, then transferring them straight to the target repository.
Technical Rationale: Why the Metadata File (.vbm) is Critical
Copying the tiny (several KB) .vbm (Veeam Backup Metadata) file alongside the massive multi-gigabyte .vbk data file is the crucial operational technique here:
- Importing
.vbkAlone: Without the metadata file, the target Veeam instance must parse and deep-scan the entire physical.vbkarchive block-by-block to rebuild its catalog and disk headers, introducing substantial pre-restore delays. - Importing
.vbk+.vbmin Tandem: The.vbmfile stores complete structural information, including VM hardware specifications, virtual disk geometries, and restore point chain definitions. Even in an isolated network completely disconnected from the original backup database, target Veeam v13 registers the backup chain instantaneously upon clickingImport Backup, enabling zero-delay restoration.
2. Veeam Restore Session: VirtIO Driver Injection Mechanics
Once the imported backup chain was registered, a Full VM Restore targeting the HPE VME (SimpliVity) cluster was initiated. Below is the operational transcript recorded during the live restore session.
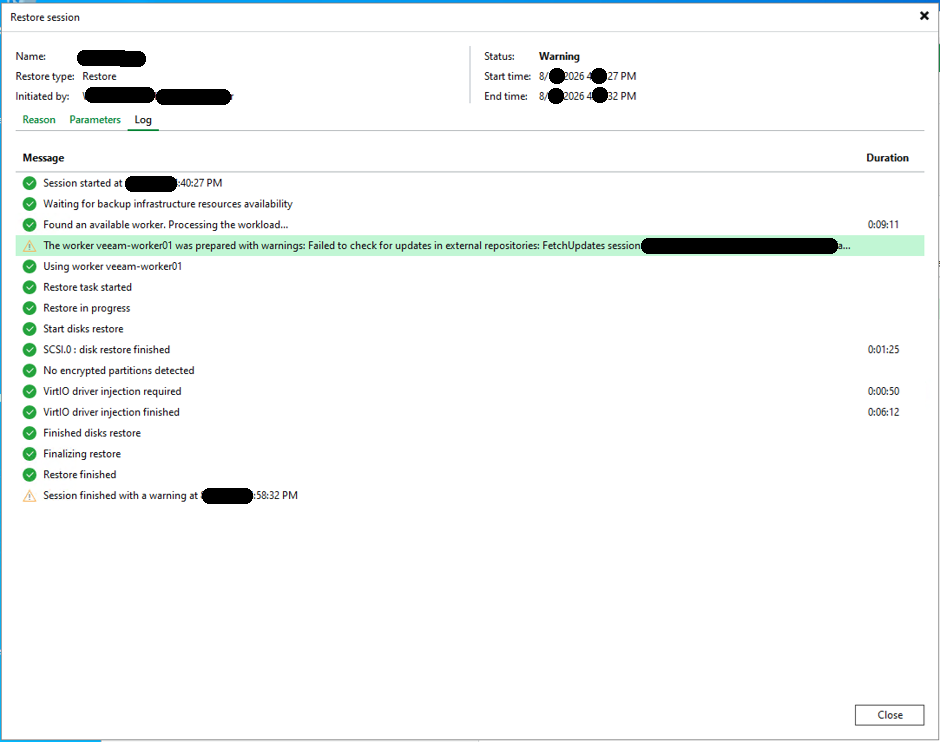 (Figure: Veeam Restore session transcript detailing KVM worker allocation, disk recreation, VirtIO driver injection, and final elapsed duration)
Recovery Time Objective (RTO) Metrics
- Session Start:
40:27 PM - Session Finish:
58:32 PM - Net Restore Duration: 18 minutes 5 seconds
Had this workload been transferred over the 10Mbps link, replication would have exceeded half a day. Restoring directly from local physical media achieved full instance provisioning in under 18 minutes (RTO satisfied).
Solving the V2V Challenge: Automated VirtIO Driver Injection
Migrating from VMware ESXi to KVM-based HPE VME presents an immediate storage controller architectural mismatch:
- VMware:
LSI Logic SASorVMware Paravirtual (PVSCSI)controllers - KVM (VME): High-performance
VirtIO SCSIcontroller
Powering on a converted disk without pre-loaded storage drivers triggers a catastrophic Blue Screen of Death (BSOD 0x7B: Inaccessible Boot Device).
Veeam circumvents this hurdle by deploying a dedicated KVM worker appliance (veeam-worker01), which mounts the offline Windows virtual disk and directly injects storage and networking drivers into the registry and driver store:
VirtIO driver injection required (0:00:50)
VirtIO driver injection finished (0:06:12)
In approximately 6 minutes, Red Hat KVM VirtIO storage and network drivers were fully injected into the offline system image, ensuring immediate storage recognition upon initial boot.
3. HPE VME Manager: HVM Instance Provisioning and Power-On
Following Veeam’s restore finalization, the newly instantiated workload appears within the HPE VM Essentials (VME) Manager administrative interface.
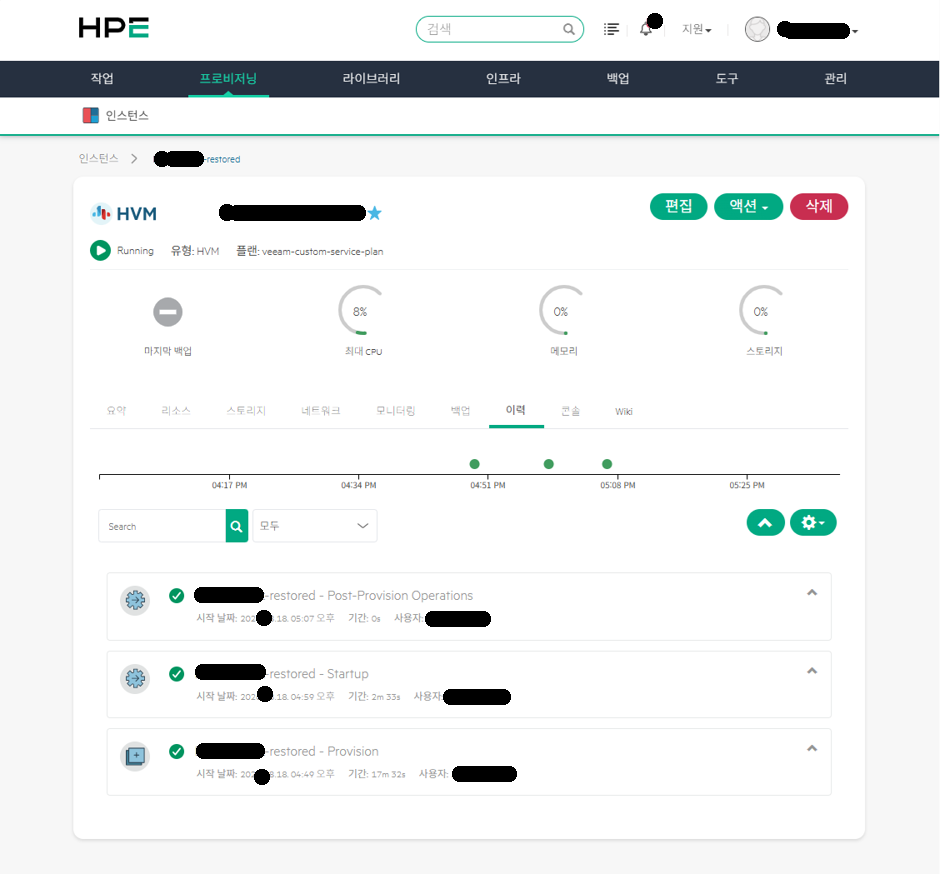 (Figure: HVM instance automatically provisioned under veeam-custom-service-plan running normally in HPE VME console)
- Instance Status:
Running - Virtualization Type:
HVM(Hardware-assisted Virtual Machine on KVM) - Service Plan:
veeam-custom-service-plan(Mapped automatically via Veeam API matching original VM hardware sizing) - Lifecycle History:
Provision: 17 minutes 32 seconds (Disk synthesis and conversion via Veeam worker)Startup: 2 minutes 33 seconds (Hypervisor-level instance initial power-on)Post-Provision Operations: Instantaneous completion
The native integration between Veeam and VME bypassed manual VM shell configuration, translating original vCPU, vRAM, and disk specifications seamlessly into the VME cluster.
4. Guest OS Verification: Device Manager and Clean Driver Handshake
True recovery success is validated from within the guest OS by confirming device driver bindings and the absence of hypervisor software conflicts. Connecting to the restored instance via the VME web console revealed pristine operating health.
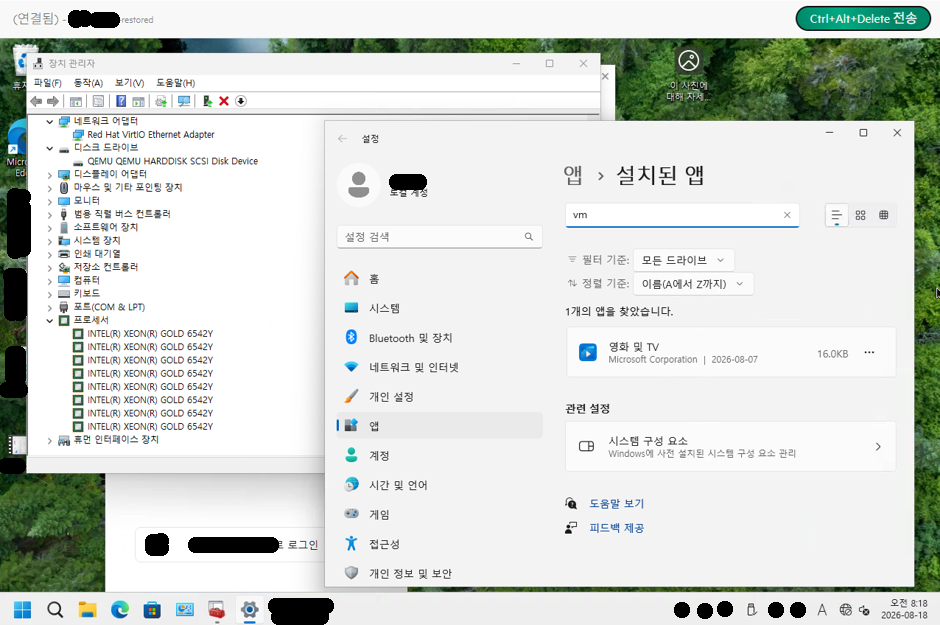 (Figure: Verified Red Hat VirtIO Ethernet and QEMU SCSI disk controllers, physical Intel Xeon Gold CPU model passthrough, and clean removal of VMware Tools)
Key operational checks within Windows 10 Device Manager and App Settings confirmed:
- Flawless Red Hat VirtIO Driver Operation:
- Network Adapter: Running on
Red Hat VirtIO Ethernet Adapter. - Disk Drive: Operating via
QEMU QEMU HARDDISK SCSI Disk Device. - No yellow warning exclamations or unrecognized peripheral devices.
- Network Adapter: Running on
- Physical SimpliVity Host CPU Binding:
- Processor inventory correctly identifies the physical host
Intel Xeon Gold 6542Yprocessors, ensuring optimal hardware instruction set execution.
- Processor inventory correctly identifies the physical host
- Clean VMware Tools Demarcation:
- Verifying
Settings > Apps > Installed appsconfirmed that legacy VMware Tools services were cleanly deactivated without driver-level conflicts. - The desktop environment loaded smoothly without display flickering, service hang-ups, or residual background daemon errors commonly encountered during hypervisor transitions.
- Verifying
5. Key Takeaways & Operational Conclusion
- In low-bandwidth environments (10Mbps), physical backup relocation remains king:
Insisting on network replication across narrow WANs risks missing critical disaster recovery windows. For structured cutovers or air-gapped recovery, transferring full backup data (.vbk) and metadata (.vbm) files directly into a target repository provides the safest, most deterministic restoration path. - Pre-flight driver injection is non-negotiable for V2V transitions:
Preventing 0x7B boot loops between VMware and KVM requires verified offline injection mechanisms. Utilizing Veeam’s automated VirtIO injection guarantees bootable system images within a single 18-minute window. - Post-restore guest verification routine:
Always verify Device Manager controllers and confirm that legacy hypervisor tools (such as VMware Tools) do not cause silent driver collisions on the new KVM stack.