After completing the deployment of an HPE SimpliVity 6.2.0 and VME (VM Essentials) cluster, the next operational milestone is provisioning workload virtual machines (VMs, Instances) and installing target guest operating systems (Linux, Windows Server).
In VM Essentials, deploying virtual machines from scratch requires registering OS installation ISO media in the Virtual Image Library. To ensure high-capacity ISO files are stably retained and universally accessible across all cluster nodes, an NFS file share storage backend must be pre-integrated into VME Manager.
This guide details the complete operational procedure—from registering the management server’s NFS export folder as a VME image store to uploading OS installation ISO files and verifying their backend directory paths. It also covers practical workarounds for browser upload timeouts on large ISO files and essential NFS export permission considerations.
1. End-to-End Workflow
Registering virtual images into VME Manager involves four sequential phases: backend verification, file share attachment, ISO upload, and storage path validation.
flowchart TD
    Step1["Phase 1: Verify NFS Server Export<br/>(Host CLI: exportfs -v)"] --> Step2
    Step2["Phase 2: Attach NFS File Share in VME Manager<br/>(Infrastructure > Storage > File Shares > NFSv3)"] --> Step3
    Step3["Phase 3: Register ISO in Virtual Images Library<br/>(Library > Virtual Images > + Add > ISO)"] --> Step4
    Step4["Phase 4: Confirm Upload & Storage Hierarchy<br/>(Inspect morpheus-virtual-images path)"]
2. Essential Prerequisites & Verification
Review these three prerequisites before initiating uploads to avoid provisioning roadblocks:
- Enable ‘Default Virtual Image Store’
When configuring an NFS file share in VME Manager, always checkDefault Virtual Image Store. This flag designates the share as the default repository bucket for virtual images, ensuring cluster nodes can reference the images during VM provisioning without path resolution errors. - NFS Export Permissions (
no_root_squash)
VME Manager service daemons require write permissions to create subdirectories and stream multi-gigabyte ISO files. Ensure the host/etc/exportsincludesrw,no_root_squash,no_subtree_check. - Internal Directory Structure of VME Images
VME does not dump uploaded ISO files into the root of/nfs. Instead, it stores them within an isolated directory hierarchy:/nfs/morpheus-virtual-images/<NumericID>/<filename.iso>.
3. Step-by-Step ISO Registration Guide
Step 01. Verify NFS Server Export Status (CLI)
Verify that the NFS service on the management server (Ubuntu BaseOS) is actively exporting the target directory (/nfs):
# Verify active NFS exports
root@vmemgr:/home/vmeadmin# exportfs -v

Confirm that the output includes proper export options such as /nfs <world>(sync,wdelay,hide,no_subtree_check,sec=sys,rw,insecure,no_root_squash,no_all_squash).
Step 02. Navigate to Storage File Shares Menu
Log into the VM Essentials Manager console (https://<VME_Manager_IP>):
- Navigate to [Infrastructure] -> [Storage].
- Select the
File Sharestab. - Click the **
[+ Add]**dropdown on the right and selectNFSv3.
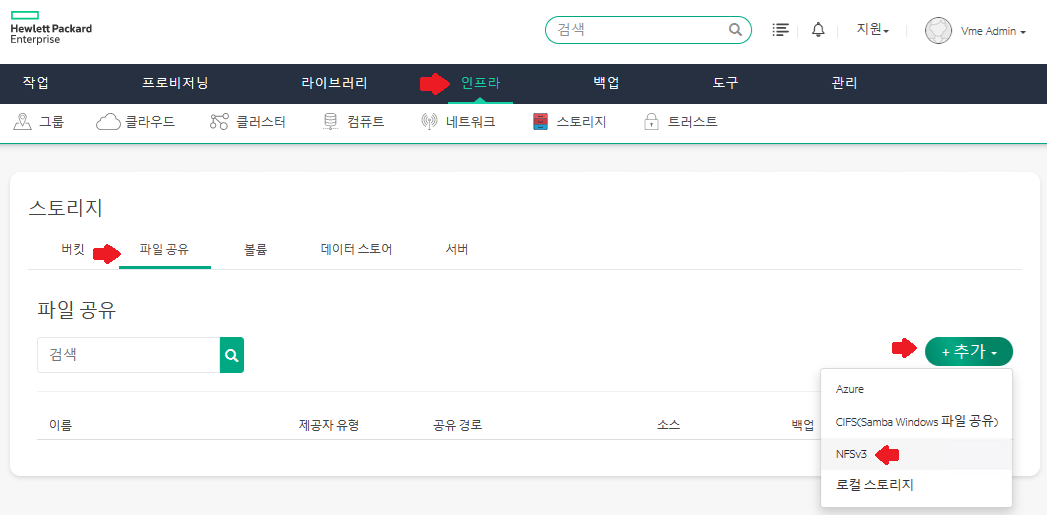
Step 03. Configure New File Share Parameters
In the New File Share modal, enter the configuration parameters:
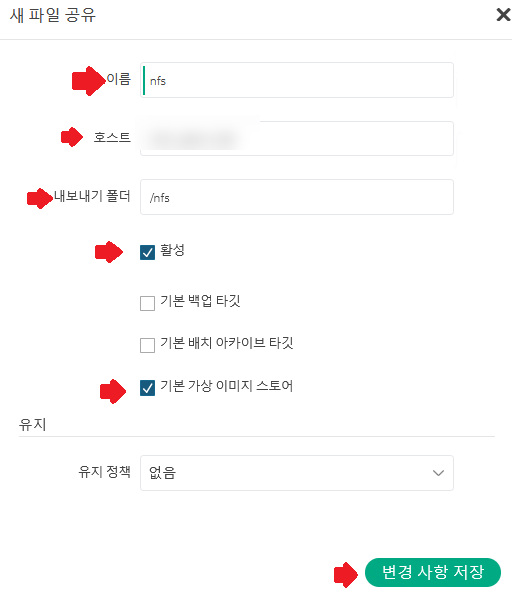
- NAME: Identifier for the share (e.g.,
nfs) - HOST: IP address of the NFS host (management server IP)
- EXPORT: Export directory path (e.g.,
/nfs) - Checkbox Options:
[✔] Active: Checked[ ] Default Backup Target: Unchecked[ ] Default Deployment Archive Target: Unchecked[✔] Default Virtual Image Store: Required
- Click
[Save Changes]at the bottom right.
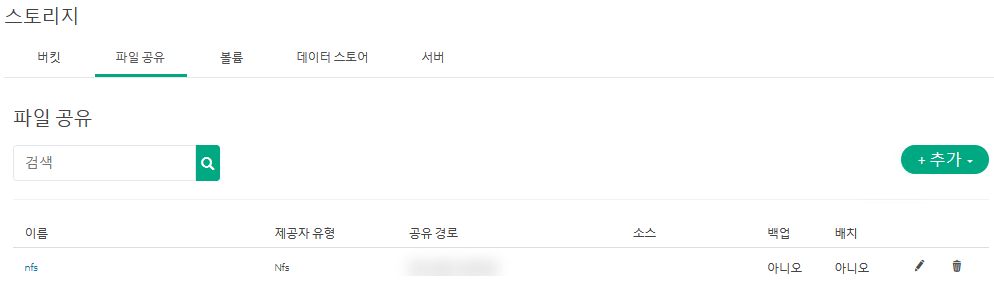
Step 04. Confirm File Share Attachment
Upon returning to the File Shares view, the registered NFS share will be listed:
- NAME:
nfs - TYPE:
Nfs - PATH:
<NFS_Server_IP>:/nfs
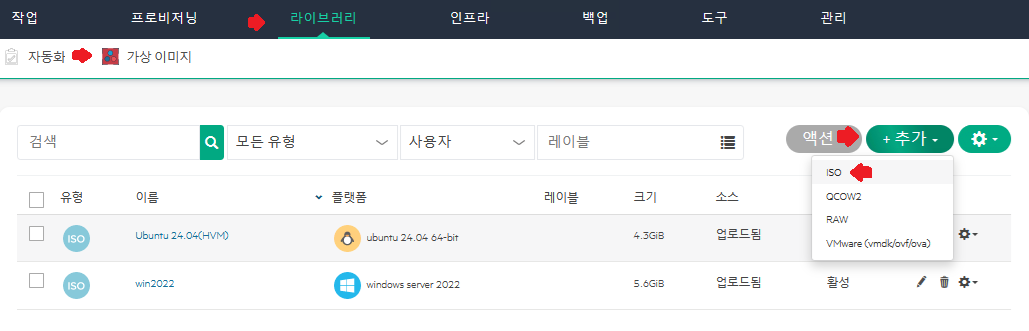
Step 05. Open Virtual Images Library
To upload the ISO file:
- Navigate to [Library] -> [Virtual Images].
- Click the top-right
[+ Add]dropdown and selectISO.
Step 06. Specify Virtual Image Metadata & Storage Bucket
In the Upload Virtual Image modal, enter the image properties:
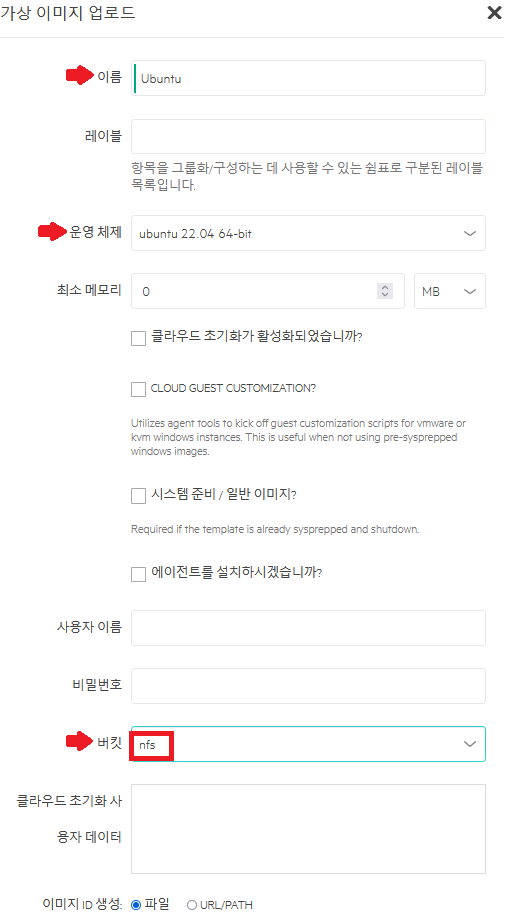
- NAME: Display name for VM provisioning (e.g.,
Ubuntu 22.04orWindows Server 2022) - OS: Target operating system family (e.g.,
ubuntu 22.04 64-bit) - MIN MEMORY: Default
0MB - STORAGE BUCKET: Select the
nfsshare created in Step 03 - IMAGE ID SOURCE: Select the
● Fileradio button
Step 07. Upload Image File and Configure Virtualization Flags
Scroll down to upload the media file and confirm compatibility flags:
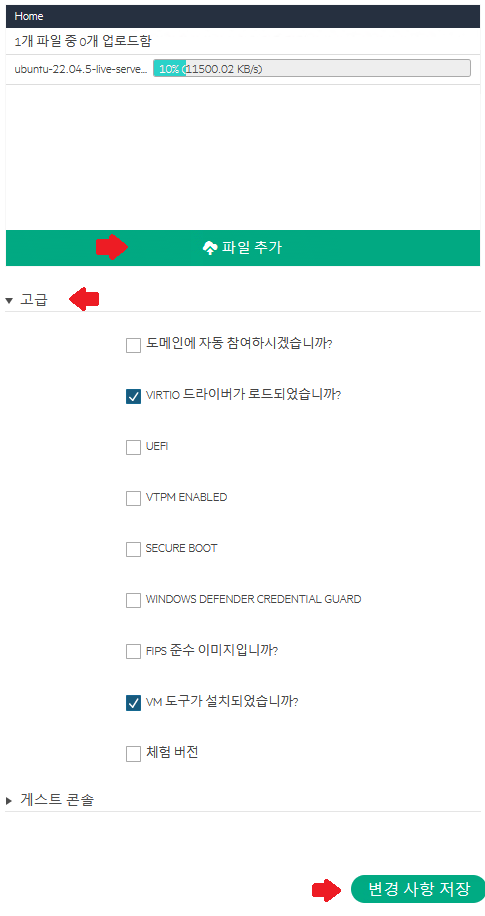
- File Upload: Click
[Add File]or drag and drop the ISO image (e.g.,ubuntu-22.04.5-live-server-amd64.iso). Wait until the upload progress reaches 100%. - Advanced Settings:
[✔] VirtIO Drivers Loaded?: Checked for modern Linux distributions (verify VirtIO injection for Windows)[✔] VM Tools Installed?: Checked- Specify UEFI, Secure Boot, or vTPM flags based on OS requirements.
- Click
[Save Changes].
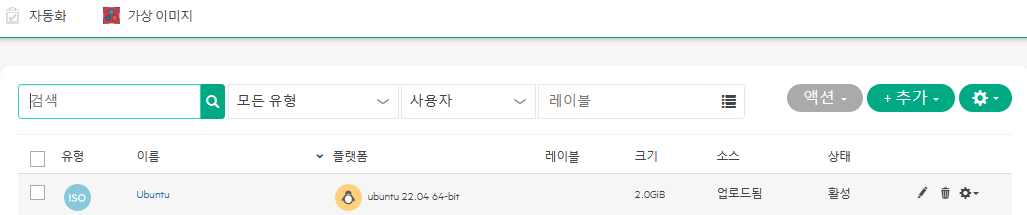
Step 08. Verify Image Active Status in Library
Once uploaded, the new ISO image appears in the Virtual Images table:
- TYPE:
ISO - NAME:
Ubuntu - PLATFORM:
ubuntu 22.04 64-bit - SIZE: Actual file size (e.g.,
2.0 GiB) - SOURCE:
Uploaded - STATUS:
Active
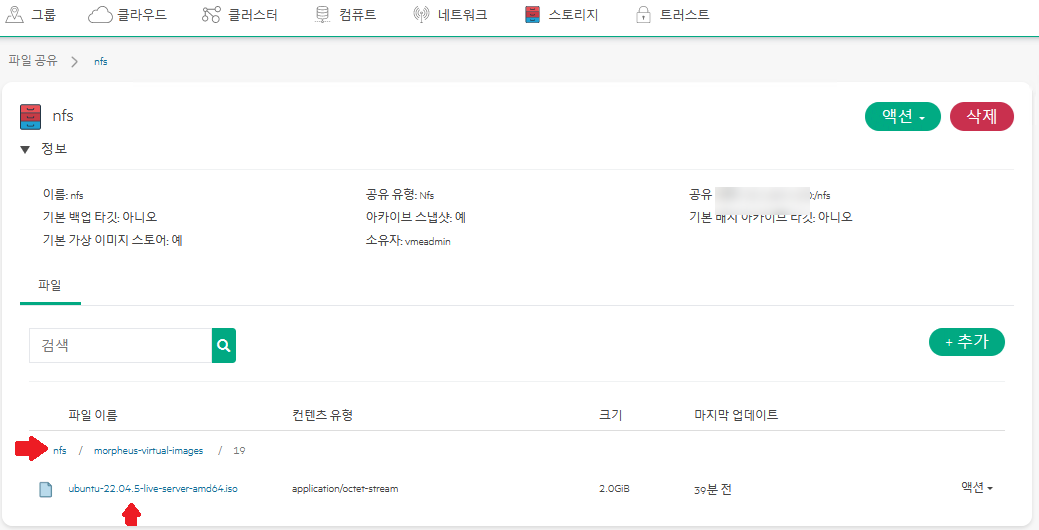
Step 09. Verify Storage Directory Structure
Inspect the backend NFS filesystem path:
- Navigate to [Infrastructure] -> [Storage] -> [File Shares] ->
nfs. - The file browser confirms the path:
nfs / morpheus-virtual-images / 19 / ubuntu-22.04.5-live-server-amd64.iso
VME cleanly assigns a dedicated numeric ID subdirectory to maintain structured isolation.
4. Attaching the ISO to Virtual Machines
With the image registered, attach it to guest instances during provisioning:
- Navigate to [Provisioning] -> [Instances] -> [+ Add].
- Select instance technology (
KVMorHVM). - In the storage phase, map the
CD ROMdrive toUbuntu (ISO). - Power on the VM to boot directly from the media and proceed with installation.
5. Field Troubleshooting: Upload Timeouts and Permissions
[!WARNING] Browser Disconnect During Large ISO Uploads (5GB+)
- Cause: Short client body timeout configurations on ingress proxies or load balancers.
- Resolution: Instead of browser-based uploads, copy the file directly to
/nfsvia SCP on the management host. In the VME image registration dialog, select● URL/PATH(file:///nfs/...) to index the local file instantly without network streaming delays.
[!WARNING] Virtual Image Status Displays ‘Error’ or ‘Failed’
- Cause: Insufficient capacity on the NFS volume or permission denial when creating
morpheus-virtual-images.- Resolution: Check available disk capacity with
df -h /nfsand verify write permissions on the directory (chmod -R 775 /nfs).
6. Summary
Configuring the ISO library in HPE VME bridges foundational cluster deployment with active workload provisioning.
Ensuring that the NFS share has Default Virtual Image Store enabled and no_root_squash configured eliminates common permission and discovery issues, providing a seamless foundation for ongoing VM deployments.