Operating Cisco MDS SAN switches—the storage fabric backbone in enterprise datacenters—requires real-time telemetry into hardware component health (fans, power supplies, thermal sensors), FC port link state, and fabric zoning events via an integrated Network Management System (NMS: Zabbix, PRTG, Nagios).
A frequent misconfiguration in production is executing snmp-server enable traps globally. Indiscriminately enabling every trap floods the monitoring collectors with low-severity debug notifications, triggering trap storms and elevating switch CPU utilization.
Enterprise best practice dictates selectively activating only high-impact MIB trap categories.
This guide outlines the standard configuration sequence for SNMP v2c (Community, Host), selective MIB trap enablement, running configuration persistence, and official Cisco MIB dependencies for NMS ingestion.
1. Example of pre-preparation and setting parameters
The basic parameters of the practical and field application environment are defined as follows:
| item | Example settings | explanation |
|---|---|---|
| Equipment Model | Cisco MDS 9148S | SAN Fabric Switch |
| **SNMP Version ** | v2c | The most widely used standard SNMP version in practice |
| **Community String ** | SDS (example) | For security reasons, use the organization standard name instead of the default public |
| **Access Rights ** | ro (Read-Only) | Read-only permission for NMS collection |
| **NMS Monitoring Server IP ** | 192.168.100.10 | Monitoring server IP to receive trap events |
| **Trap listening port ** | UDP 162 | Standard SNMP Trap Port |
2. Basic SNMP environment settings (Community & Host Trap)
First, connect to the MDS switch using a terminal console or SSH and enter global configuration mode (config terminal).
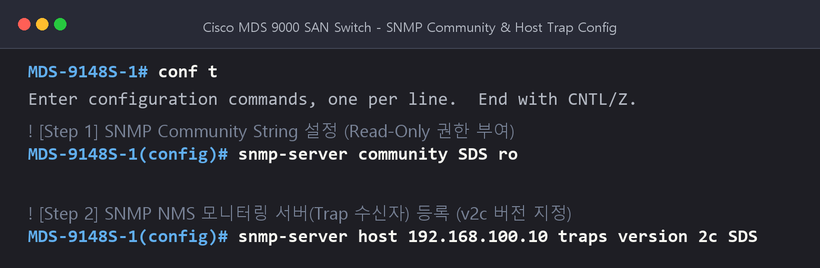
2.1. Execute command
# 전역 설정 모드 진입
conf t

# 1. SNMP Community String 생성 및 Read-Only(ro) 권한 부여
snmp-server community SDS ro

# 2. NMS 모니터링 서버로 SNMP Trap 전송 설정 (버전 v2c)
snmp-server host 192.168.100.10 traps version 2c SDS
2.2. terminal run screen
[!TIP] Community Security Recommendations > Community for monitoring purposes must be set to
ro(Read-Only). If set torw(Read-Write), there is a risk of the switch settings being arbitrarily changed from outside through SNMP vulnerability.
3. Individual activation of major MIB notifications based on Reference Guide
Based on the list of important MIBs in the source and official reference guides, only notifications that should never be missed in practice are individually activated.
3.1. Hardware and entity management (related to ENTITY-MIB)
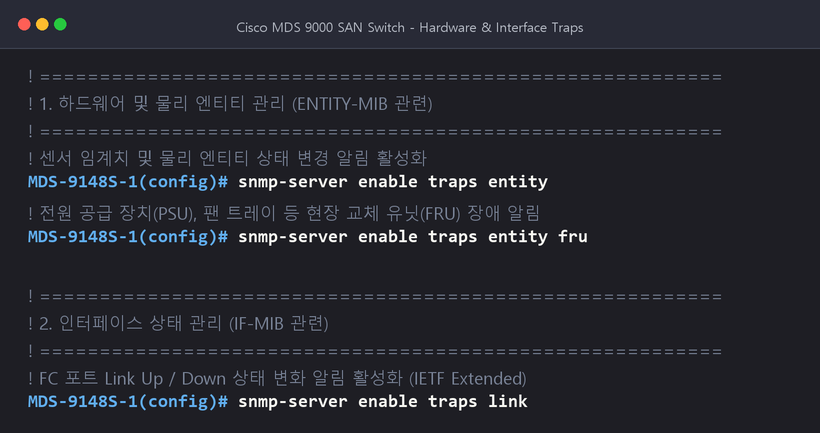
This is an essential setting to immediately detect physical failures such as physical components of the switch chassis, power supply unit (PSU), and cooling fan tray.
# 물리적 엔티티 및 센서(온도, 전압 등) 상태 변경 알림
snmp-server enable traps entity

# 현장 교체 가능 유닛(FRU: 파워서플라이, 팬 등) 장애/탈착 알림
snmp-server enable traps entity fru
3.2. Interface state management (related to IF-MIB)
Detects changes in the Link Up / Down status of FC (Fibre Channel) ports connected to server HBA or storage ports.
# FC 포트 링크 상태 변경 알림 (기본적으로 IETF extended 알림 활성화)
snmp-server enable traps link
Note: You can optionally refine the notification type by adding the snmp-server enable traps link cisco or ietf options.
3.3. Hardware and Interface Notifications Terminal Screen
3.4. Fabric and virtual SAN management (related to CISCO-DM, FCNS, ZONE MIB)
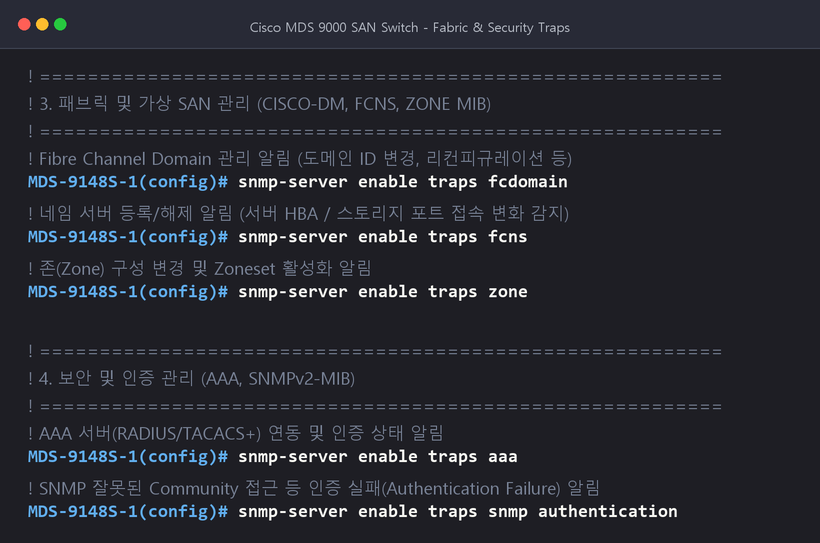
Real-time monitoring of FC domain, name server, and zone configuration changes, which are core functions unique to SAN switches. This is a key notification that catches storage path loss or unauthorized zone changes.
# FC 도메인 관리 알림 (도메인 ID 변경, 리컨피규레이션 등)
snmp-server enable traps fcdomain

# 네임 서버(FCNS) 알림 (신규 서버 포트 플러그인 / 로그인 해제 감지)
snmp-server enable traps fcns

# 존(Zone) 구성 및 활성 Zoneset 변경 알림
snmp-server enable traps zone
3.5. Security and system management (related to AAA, SNMPv2-MIB)
Detects communication problems with the switch login authentication server or unauthorized access attempts through an incorrect community.
# AAA 서버(TACACS+ / RADIUS) 연동 및 인증 알림
snmp-server enable traps aaa

# SNMP 인증 실패(잘못된 커뮤니티 접근 등) 알림
snmp-server enable traps snmp authentication
3.6. Fabric and Security Notification Terminal Screen
4. Permanent saving and verification of settings (Save & Verification)
Since Cisco MDS switches are NX-OS based, the current running memory configuration (running-config) must be saved as the startup configuration (startup-config) in NVRAM to preserve the configuration across reboots.
4.1. Save Config
# 설정 모드 종료
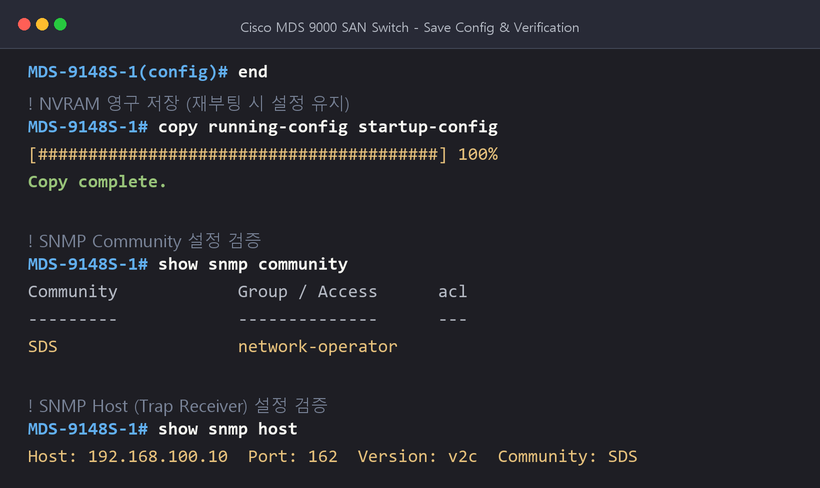
end

# NVRAM 영구 저장
copy running-config startup-config
4.2. Configuration verification command (Verification)
Verify that the community and host traps are registered properly:
# 1. 등록된 SNMP Community 확인
show snmp community

# 2. 등록된 Trap 수신 호스트(NMS) 확인
show snmp host

# 3. 활성화된 Trap 항목 전체 확인
show snmp trap
4.3. Save and Verify Terminal Screen
5. Required MIB file information for NMS server
For the NMS monitoring server (Zabbix, PRTG, etc.) to parse the OID numbers (e.g. .1.3.6.1.4.1.9...) received from the MDS switch into human-readable names (ciscoMds..., entPhysicalDescr), Cisco MIB files must be registered in the MIB directory of the NMS server.
5.1. Required MIB file list
The six MIB files below are key files for interpreting the notifications set in this post:
SNMPv2-SMI.my: SNMPv2 structure definition base MIBSNMPv2-MIB.my: System basic information and authentication trap MIBRFC1213-MIB.my: MIB-II standard management MIBIF-MIB.my: Interface (FC port) status and traffic MIBCISCO-SMI.my: Cisco-specific Enterprise OID root definition MIBENTITY-MIB.my: Physical entity management MIB such as chassis, slots, power, and fans.
5.2. Cisco official MIB download path
You can download the MIB files for the MDS 9000 Series for free directly from Cisco’s official GitHub repository:
🔗 Go to Cisco MIB official GitHub repository: 👉 https://github.com/cisco/cisco-mibs/tree/main/supportlists/mds9000
[!NOTE] NMS MIB Loading Order Tips Since there is a dependency relationship when compiling a MIB file or importing it to NMS, you must first load the root definition files
SNMPv2-SMI.myandCISCO-SMI.myand then load the lower MIBs (ENTITY-MIB.my,IF-MIB.my, etc.) to prevent parsing errors.
6. Summary and practical tips at a glance
| step | key commands | main purpose |
|---|---|---|
| Basic settings | snmp-server community <string> ro and host <IP> traps | Polling collection permission and NMS trap transmission route designation |
| Hardware Monitoring | snmp-server enable traps entity / entity fru | Immediate detection of fan, power (PSU), and temperature sensor failures |
| Port Monitoring | snmp-server enable traps link | FC Port Link Down/Up Failure Detection |
| Fabric Watch | snmp-server enable traps fcdomain / fcns / zone | SAN fabric and zone change detection |
| Security Surveillance | snmp-server enable traps aaa / snmp authentication | Unauthorized access and authentication failure detection |
| save | copy running-config startup-config | Retain settings across reboots |
Selectively configuring SNMP trap categories—focusing on physical chassis health, FC link state, and fabric mutations—protects switch management planes from trap storm overhead while ensuring rapid detection of critical storage infrastructure outages.